Before we begin, we need to mention an important factor in why we build our maps the way we do. Google Maps is far superior technically to the IGN TOP25 maps on the Géoportail website, but TOP25 maps have far more detail than Google Maps. We use the best features of the IGN TOP25 maps and Google Maps to make our maps – for example, TOP25 maps show all GRs and GRPs, while Google Maps don’t show any GRs or GRPs.
People planning to walk on a GR or GRP in France are well catered for, with Topoguides (if one exists for their planned walk) and TOP100 maps, which have GRs marked on them.
However, TOP100 maps don’t have the detail of the excellent, larger-scale TOP25 maps. All things being equal, TOP25 maps are the maps to use, but they would require the walker to carry a huge number of maps for a long walk. To avoid this, you can take screenshots of your proposed GR or GRP walking track from the online TOP25 map and print them out.
However, if you plan to make up your route, you can design it using Google Maps, make a KML file of that route, and then import it into the online TOP25 map in Géoportail.
This TOP25 map can then be used to make hard copy maps, or, for people who prefer using a mobile phone (not us), they can access their map by opening their Géoportail account on their mobile.
There is an easy method and a hard, time-consuming method. The easy method has little gaps in the route, caused by the fact that Google Maps are not as accurate as IGN TOP25 Maps.
The hard method does not have these little gaps (and is not recommended unless you are really keen and you enjoy playing with maps). Still, it works very well for us because we have special requirements – we need to produce a single, continuous line for each year’s walk to import into our website. Examples of this method are shown on these maps.
The following description is the easy method. We start with some background information.
As mentioned above, you will need to create a KML file during this exercise. This is done using Google Maps, so you must have a Google account to follow this explanation.
There are two important limitations with Google Maps: the maximum number of layers is ten, and there is also a maximum number of points in a route that can be edited. The maximum number of points is a big number, so that won’t concern us.
The default number of routes in a layer is one, but it is possible to increase the number of routes in a layer (this will be demonstrated later).
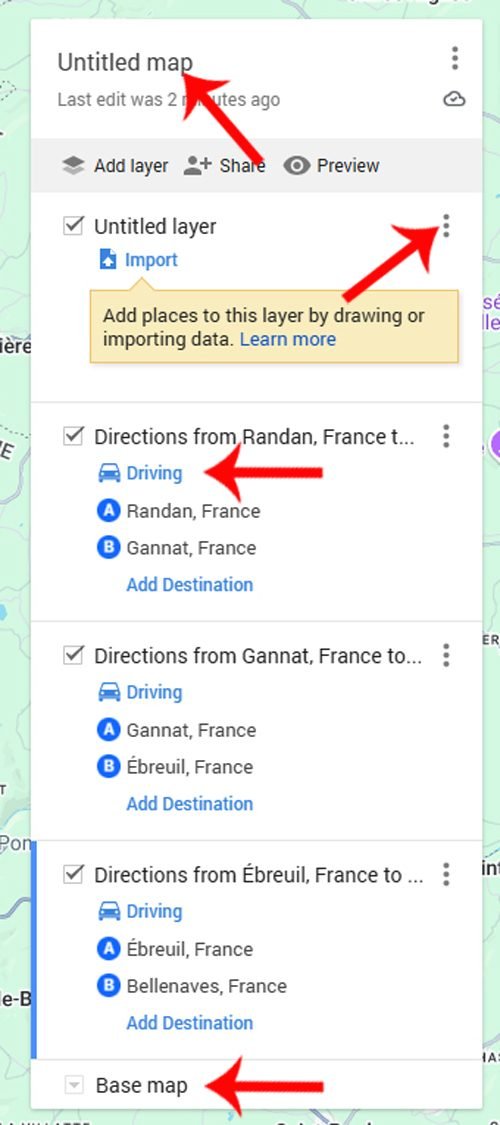
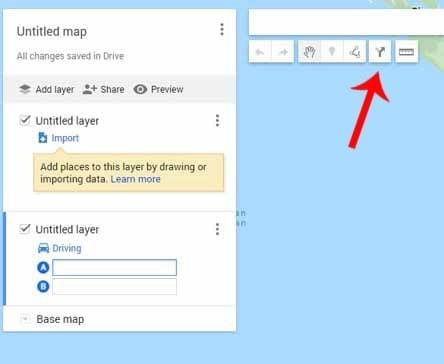
To the right is a Google Maps control panel. Working down the red arrows:
- “Untitled map” is the default map name (can be changed by clicking “Untitled map”,
- The “Untitled layer” is the default layer for importing a route (not needed in this example, so can be deleted via the three dots on the right of the layer),
- “Driving” is the default transport mode. For us, click the Driving symbol then select the Walking symbol,
- “Base map” at the bottom of the control panel is used to change the background map, for instance, to a Satellite view.
The suggested changes have been made and the result can be seen on the control panel on the left.
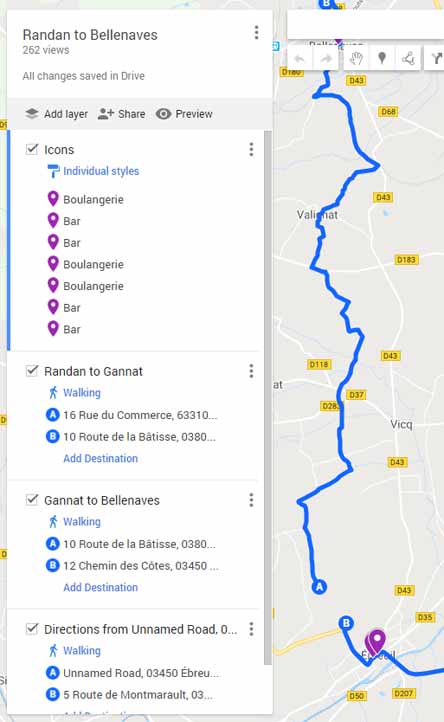
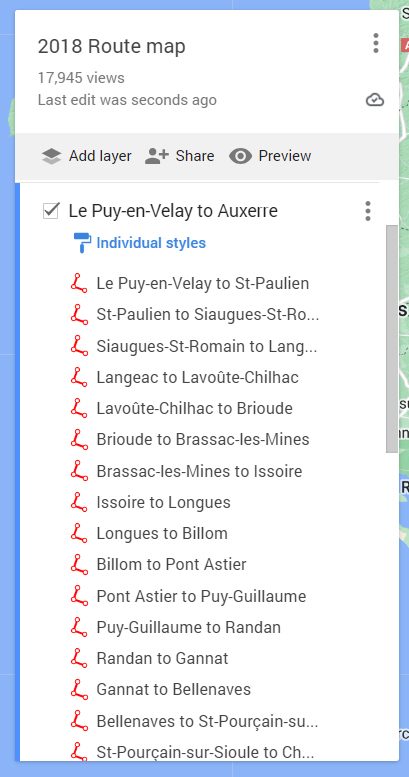
We will now start our map-making. We will create a four-day walking route from Randan to Châtel-de-Neuvre, with overnight stops in Gannat, Bellenaves and St-Pourçain-sur-Sioule. This was part of our 2018 walk.
If you are planning a long walk you would have to make more than one map initially, so we will make two maps (two days per map) to show you how to combine multiple maps into one.
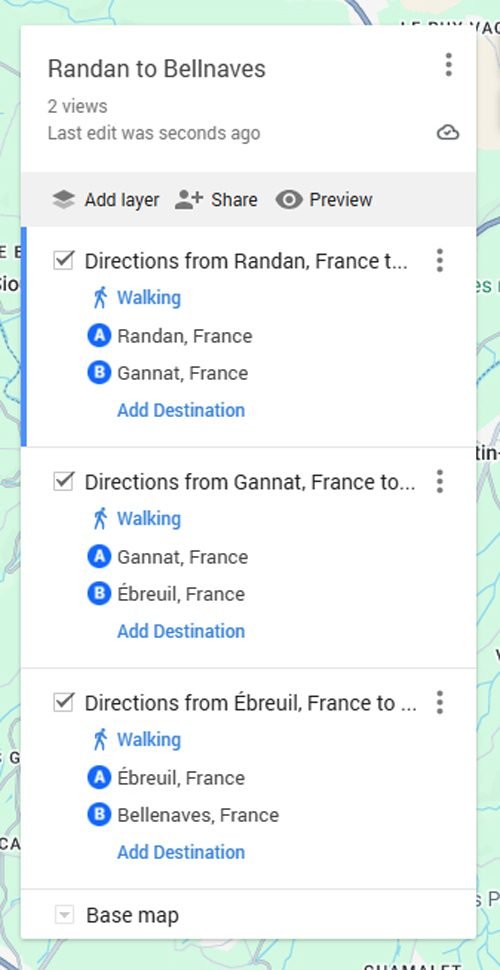
The first map we make will cover the first two days, from Randan to Bellenaves.
We start by clicking this Google Maps link. It will take you to your Google Maps which is on your Google Drive. You will see a list of any maps you might already have.
Click “CREATE A NEW MAP”, then click the “Add directions” icon, indicated by the red arrow on the left. Another Untitled Layer appears with two boxes, A and B.
The first stage of our walk is from the Hôtel du Centre, Randan, to the camping ground in Bellenaves. Enter Randan and Gannat in boxes A and B respectively.
A suggested driving route will appear, which is usually useless for walkers. Next, click the word “Driving”, then the Walking icon, which gives a slightly better route.

Drag the endpoints of the suggested route to exactly where you intend to stay (see right).
As comfort-loving walkers, we always use Google Street View to check on any bars/cafés (coffee shops) and boulangeries (bakeries) along the way for possible refreshment stops.
Any that we find we mark on the Google map with an icon (see map on left). We do this because our walks are usually long and the refreshment stops get forgotten if we don’t mark them as we are making our maps. For a short walk like this, we normally wouldn’t bother. We have included the icons just for completeness.
Google Street View is useful for taking a virtual drive on a particular road to see the state of a possible walking track as it crosses the road.
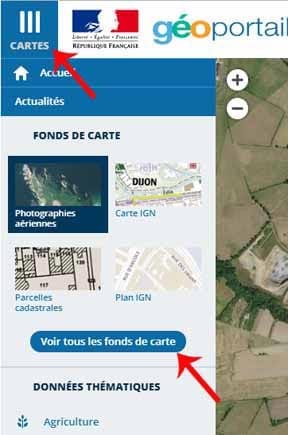
You can check for GRs in the area by visiting the Géoportail website. On the home screen search (Rechercher un lieu, une adresse, une donnée) for Randan. The default view is aerial photographs (Photographies aériennes).
To display the TOP25 map, click CARTES (Maps), indicated on the left by the top red arrow, then Voir tous les fonds de carte (See all the map types). Choose Cartes IGN classiques. Click CARTES again to hide this menu. To see the TOP25 map, zoom in until a Scale (Échelle) of 1:17,055 is shown at the bottom left-hand corner.
A useful feature of Géoportail is that if you click vos cartes personnalisées (your maps) on the Home page, you will be taken to the last map you looked at.
If there is a GR going our way, we may use it but we never follow GRs slavishly, as they are usually too circuitous for our liking.
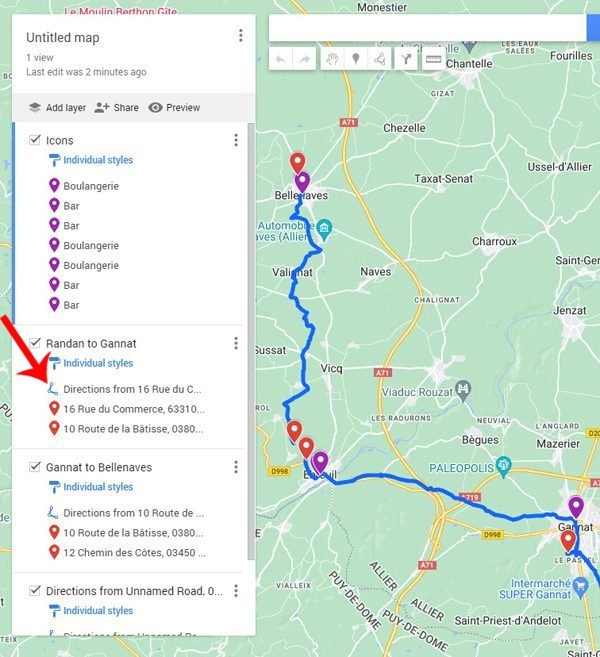
In this case, there are no handy GRs between Randan and Gannat, so drag the blue line on your Google Map and try to find a suitable walking route. What we decided on is shown on the Google Map to the right. Give suitable titles to the map and the two Untitled Layers.
When we actually did this walk, we had a problem at the place marked by the green icon. If you look at this spot on the TOP25 map, or the satellite view in your Google Map, you will see it is in a bois (forest), and working forests do have their own unique problem – changed tracks due to forestry operations.
To add to our problems, the changed track was right on the edge of our home-made map. This meant that we had to go off our map into the unknown.
As always in these circumstances, we were saved by the MAPS.ME app (a set of offline maps) which we had downloaded onto our iPod before starting our walk. (Note: Since we wrote this, a better alternative to MAPS.ME has appeared. It is called Organic Maps.)
For the time being, we are finished with day 1 of our walk. As Google is constantly saving your maps as you edit them, your map is already saved in My Maps on your Google Drive.
It is now time to find a route for the second day of our walk. We do this on our current map by clicking “Add directions” icon, and then using the same process, create a walking route from Gannat to Bellenaves camping ground.
After checking on Google, we decided to go through Ébreuil because we could have a second breakfast there. You will notice on the TOP25 map that the GR463 goes from Gannat to Ébreuil, so we could have used it, but decided to make our own way.
So our plan was to have breakfast on the way out of Gannat, find a way to Ébreuil, and then roughly follow the GR463 to Bellenaves.
What we decided on is shown on the Google Map to the right.
However, there is a problem that sometimes occurs on Google Maps – not all tracks that are on a TOP25 map are shown on a Google Map!
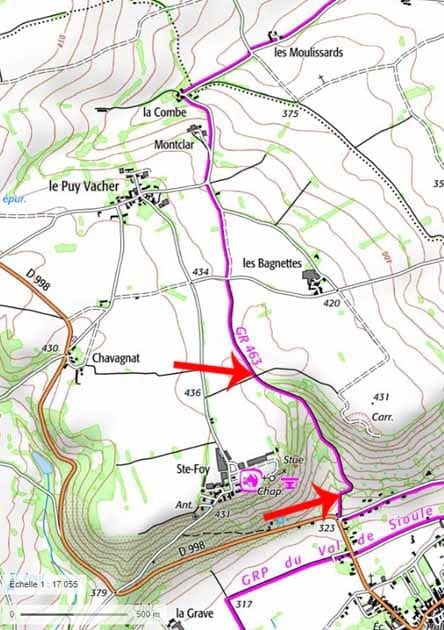
Notice that the stretch of the GR463 just after Ébreuil (orange icon above), between the two red arrows on the TOP25 map (left), is not shown between the two red icons on the greatly zoomed in Google map (below).
How to overcome this problem and bridge the gap? In this Easy Method there is no problem, we don’t worry about gaps. As we have already said, TOP25 maps with gaps are easy to follow because they show all the little lanes etc, so it is very easy to see the route across a gap.
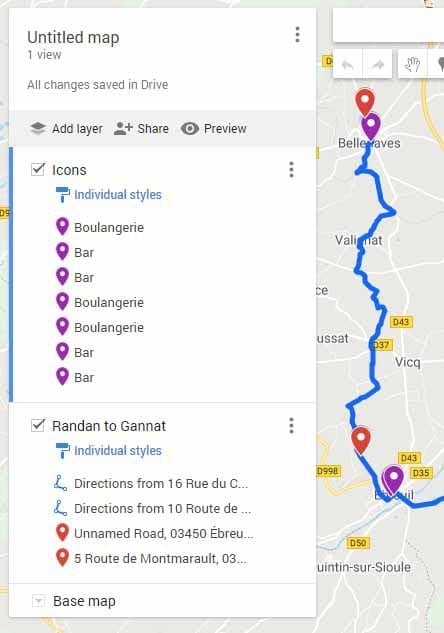
So what we have to do is replace the Google route that has a sharp “detour” with two routes with a gap; the first from Gannat to where the problem starts (B), the second starting from where the problem ends (A) to finish at Bellenaves (see Google Map above right).
The problem is that there is no actual physical address on either side of the gap. There are several ways to create a route without a physical address at an endpoint.
We begin with a line that has both the start and finish at Gannat, then drag point B out to the gap, and then do the same for the second line, starting and finishing at Bellenaves, and then dragging Point A back to the gap. The sense of both lines must be in the same direction, that is A to B.
Now delete the original suggested route. Your map at the gap should now look like the map below left.
The second step of the solution involves importing all the routes into one map.
To help find our way around our maps, it would be a good idea to rename the layer containing the line starting in Gannat to “Gannat to Bellenaves”. The control panel on your map should now look like the one to the left.
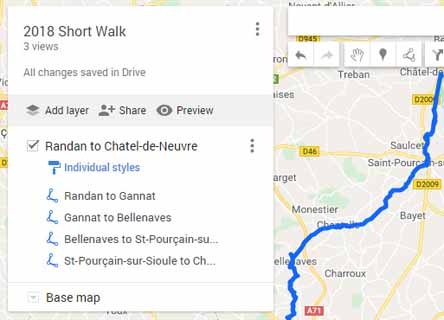
We will now start a new map for the two days from Bellenaves and St-Pourçain-sur-Sioule and show you how to join the two maps.
To open a new map, click the three vertical dots menu on your current map (indicated by the red arrow above left), then click New map.
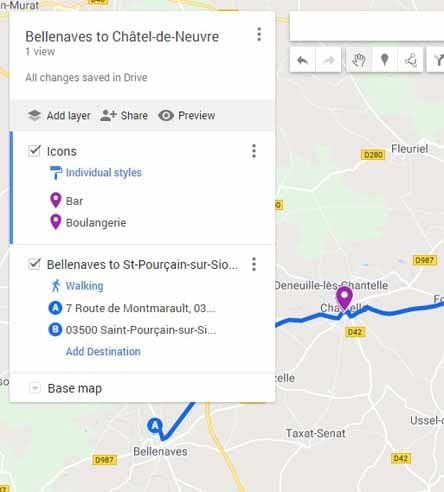
Day 3 of our walk goes from the camping ground in Bellenaves to the camping ground in St-Pourçain-sur-Sioule. Enter these names in boxes A and B as before, and go via Chantelle for a refreshment stop.
The walking route we chose is shown above right, and the control panel for the map, renamed “Bellenaves to Châtel-de-Neuvre”, is shown below right with the Day 3 route named “Bellenaves and St-Pourçain-sur-Sioule”.
Now we can find a route for our fourth and final day, St-Pourçain-sur-Sioule to Châtel-de-Neuvre, with a coffee stop in Contigny (see above).
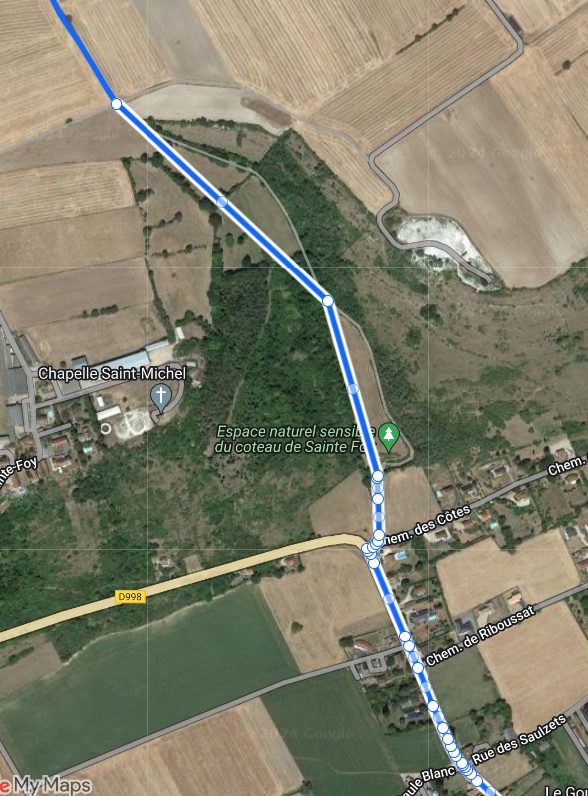
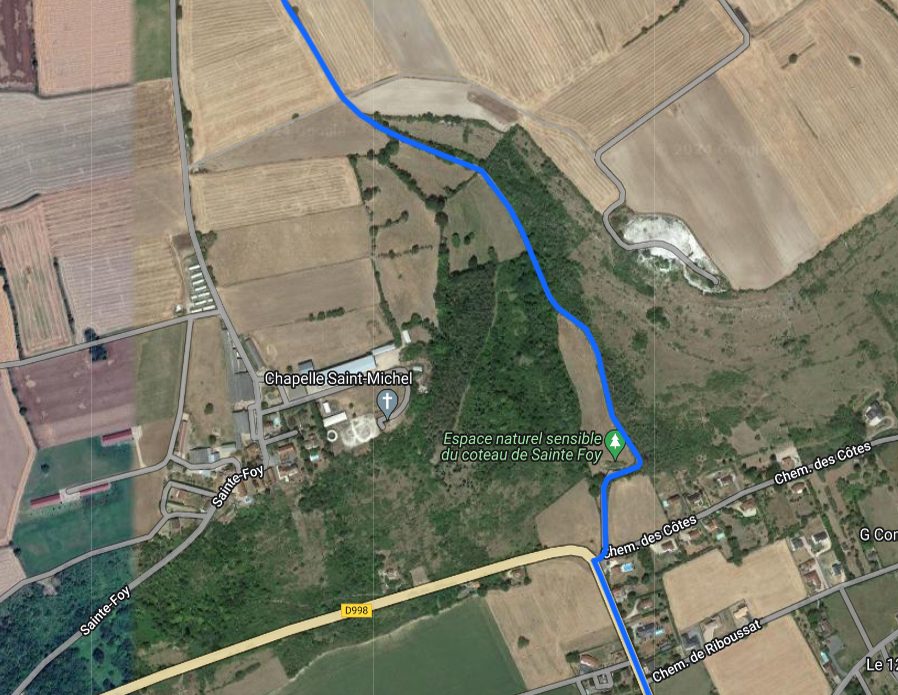
Comparing the suggested route above right to what is shown on the TOP25 map, you will notice that the GR300 goes along the bank of the Allier river on the edge of a réserve naturelle (nature reserve) from le Petit Bressolles to Châtel-de-Neuvre. The map below is a magnified view of the problem section.
Sounds like a good walk, but the GR300 track is not shown on the Google Map below, hence the detour on the D2009, a very large road!
Once again we have to bridge the gap. However this time it is a lot easier because the gap is very close to one end of the suggested route.
Just drag the endpoint B which is now at Châtel-de-Neuvre camping ground to the start of the gap, and then create another line that goes from the end of the gap to Châtel-de-Neuvre (see below).
As before, to help find our way around, it would be a good idea to rename the layer containing the line going to the gap as “St-Pourçain-sur-Sioule to Châtel-de-Neuvre”.
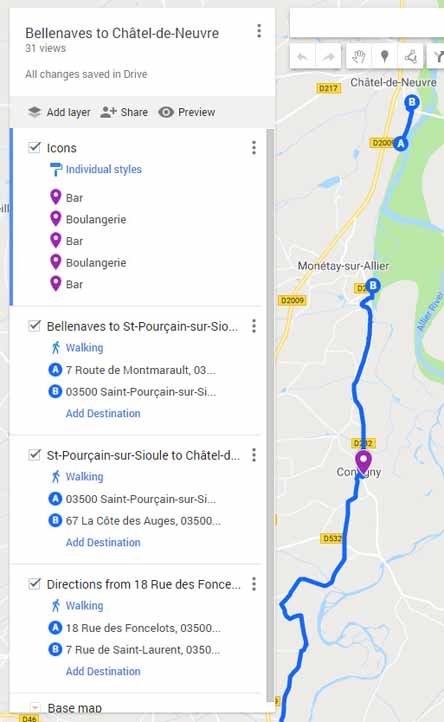
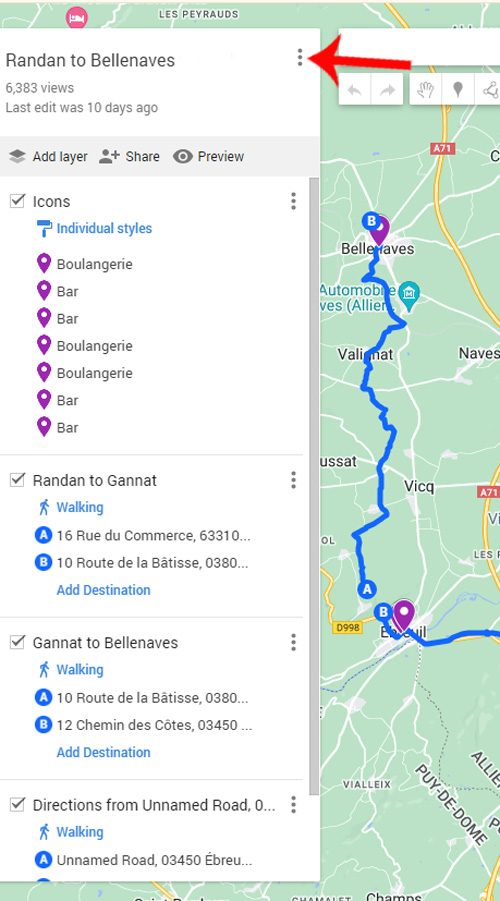
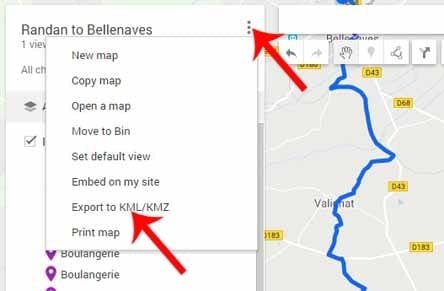
The control panel on this map should now look like the one on the left. It is now time to create the KML files for the two maps you have created. We will start with our first map, Randan to Bellenaves.
Open the first map (Randan to Bellenves). Click the three-dot menu on your map’s control panel next to the map name, then Export to KML/KMZ file (see right).
Select Export the KML file, then click Download. There should now be a KML file in your Download directory called Randan to Bellenves.
Do the same download with your Bellenaves to Châtel-de-Neuvre map. You now have the two KML files in your Download directory, Randan to Bellenaves and Bellenaves to Châtel-de-Neuvre.
Finally, create a new Google Map as before, then import the Randan to Bellenaves KML file. The control panel is shown below left. Notice that the route symbols in this panel have changed to a schematic representation of a route with dots (indicated by red arrow), meaning that it is now a KML file.
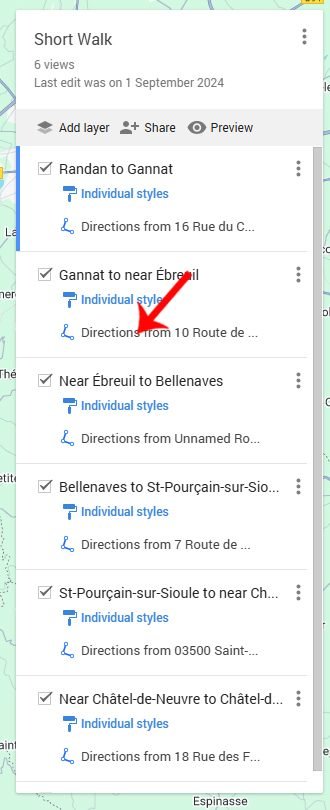
We can simplify the control panel by renaming it Short Walk, deleting the Icon Layer (if you created one), deleting any other odd icons remaining, and giving the remaining layers meaningful names (see below).
Now import the second KML file (Bellenaves to Châtel-de-Neuvre) into the new Google Map. Simplify the panel again and it should look like the panel below.
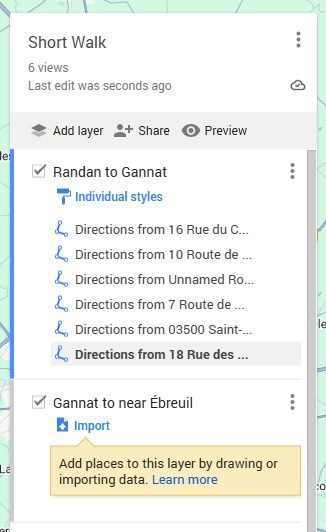
Remember that a Google Map can have a maximum of ten layers, but if you are short on layers and it is a KML file, you can drag the routes from one layer into another layer.
To increase the number of routes per layer, hover your cursor over the second top KML route direction (red arrow on the panel to the right), and select it (press left mouse button).
When a cross icon appears, drag the route up to just below the top route (sometimes it is a bit tricky to find the right spot to click). Continue doing this for each of the five lower routes.
When finished, the control panel will look like the panel below. You can delete empty layers by clicking the three vertical dots on a layer and then clicking delete.
You can now export the KML file of the Short Walk from this control panel to your Downloads, as before. There now should be a KML file in your Downloads named “Short Walk”. You are now ready to create your TOP25 Map!
But first, a little diversion. There seems to be no limit to the number of KML file routes that can be on one layer. The control panel below is for our 31-day walk in 2018. There is one route per day, and all 31 routes are on one layer, but there are too many to show in one screenshot
Of course, creating a control panel with 31 routes such as the one below requires a few intermediate steps, but the process I followed is essentially what we have just done.
With 31 routes, I needed at least four control panels (ie maps) to fit them in (remember there is a maximum of ten routes per control panel). I then converted the routes to KML files and then dragged the routes up to one layer on each panel.
Next, I created a new control panel (ie I created a new map) and imported the four layers with the 31 routes into this new panel. Finally, I dragged all the routes into one layer to produce the control panel on the right!
But now, back to the main purpose of this article, to import the Short Walk KML file into Géoportail.
Now comes the harder part. However, unless you are a map obsessive (like me), just jump ahead to below the next horizontal line.
Because we have just imported the routes as KML files, the routes are now just a series of dots and have lost the constraint of only being able to follow marked roads etc on the Google Map.
I have mentioned that a Google Map has a limit of ten layers. There is also a limit on the number of points on a route that you can edit.
As our routes are quite short, this limit will not apply. If the routes of both sides of a gap have too many dots this method doesn’t work. You can still close the gap but it involves editing the KML file – not covered in this description.
By way of example, I will close the gap near Ébreuil. You can do the following from either end of the gap. I clicked the lower route on the map to show the dots (see map right). I then clicked the Base Map control at the bottom of the control panel, selected satellite view, and obtained a very accurate view of the “missing” track on Google Maps.
I then pulled the highest dot on this line across the gap up to the start of the upper line, and on that straight line, a small intermediate dot (handle) appeared.
I pulled this handle across to the “missing” track and handles appeared on both segments of the line (see map above). Just carry on with this process until you have a line that follows the track on the satellite view (see map below).
So, the KML file of the route on the Google Map now has the gap closed near Ébreuil by a line following the route shown on the satellite view, and of course, the gap near Châtel-de-Neuvre still exists.
Export this KML file to your Downloads, as before. There should be a KML file in your Downloads named “Short Walk”. You are now ready to create your TOP25 Map!
All that remains now is to import the KML file into Géoportail.

A word of caution – the Géoportail website is a bit erratic and tends to change, so what you see may be a bit different to the images below.
For those who are interested, a description of how to remove a gap is given between the two horizontal lines below. If you are not interested, jump ahead to below the second horizontal line
Go to the Géoportail website, and click the star in the top right-hand corner of the image to the left, then click Créez un compte (Create an account).
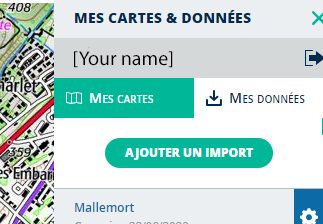
When you have an account, click Mes cartes et données (My maps and downloads) (image right). Firstly, click Mes données (My data) then click Ajouter un import (Add an import).
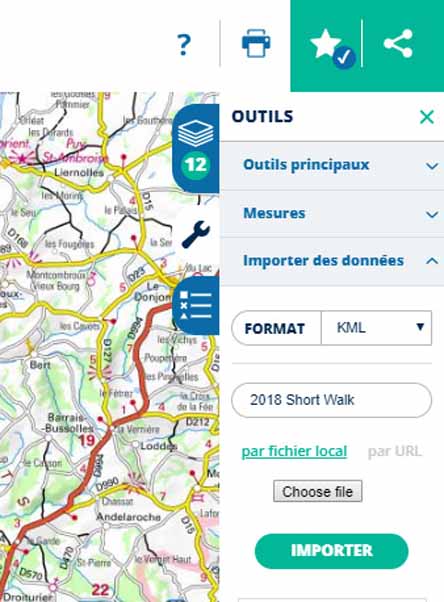
Now give the file you will import a name, Nom de la donnée, for example, “Short Walk” (image below right). Now click Choisir un Fichier (Choose a File).
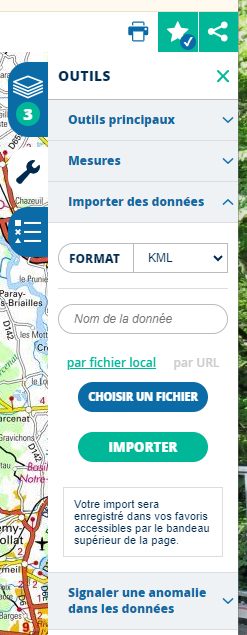
Navigate to your Downloads, click your KML file “Short Walk” you just downloaded, click Importer, and finally click Enreregister la Carte (Register your Map).
Your walking route should appear (in blue) on your Géoportail map. Mine is shown below (it can be very slow to load).
Zooming in three times on my map to a scale of 500 m produces the TOP100 map, and one more zoom (also with a scale of 500 m) shows the TOP25 map. This is the best scale to use when walking.
On my map, the gap near Ébreuil is now closed but the gap near Châtel-de-Neuvre still exists. If you zoom in on both gaps you will see it is easy to follow a route on TOP25 maps with or without gaps.
If the map below is blank (and remember, it can be very slow to load) click here
Using this scale, we take a screenshot of this map, crop it using Photoshop, and print it. We repeat this procedure, working our way along our route.
We usually set off with around 100 double-sided A4 pages of these maps, and discard them as we go along. This sounds a lot, but it is only the weight of six TOP25 maps, whereas we would need at least 25 of them to cover the same distance.
With the opacity of the line at 100%, we have found that the detail of what type of track/road is on our route is lost, so we reduce the opacity to about 35%.
There a setting for this in the KML file, but Géoportail seems to override this. However, the opacity of a line can be set in Géoportail.
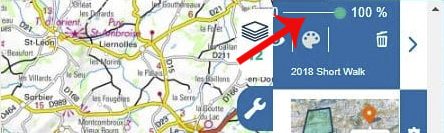
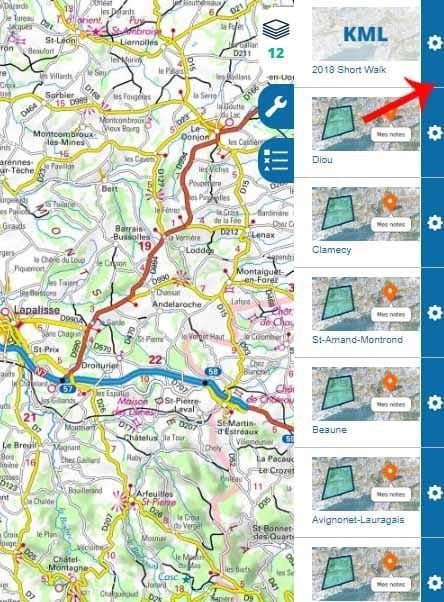
In the image to the right, click the pile of pages icon (indicated by the red arrow).
Then click at the bottom of the pane of your map, labelled 2018 Short Walk (indicated by the red arrow below). There is a bit of skill involved in finding the correct spot.
When you do click the correct spot, the opacity control appears (see below left).
A few more hazards you might encounter with Google Maps. Some very small tracks are shown on Google Maps, but only when you zoom right in.
If you look really closely at the Ébreuil gap on your first map you will see that part of the gap actually had a road marked, but it only appeared at very high zoom.
Also, Google won’t suggest a walking route through a large roundabout, presumably because of the danger factor. This can mean the suggested route may involve a very large, and unnecessary, detour when all that is required is some caution when negotiating the roundabout. When making our maps, we treat this as just another gap. Also, sometimes Google takes a long way around a low median strip in the middle of a road that can easily be stepped over.
In conclusion, you might like to look at our Géoportail TOP25 map of our 2018 walk.
I have developed this method of map-making over a few years, and I would appreciate any feedback, particularly about the use of Géoportail, which works very differently from Google Maps, and I am sure that I still have a lot to learn.
Thanks
For further information you can contact me, Keith, at: